
How to Clean a Conical Burr Coffee Grinder: Step-by-Step Maintenance Guide for 2026
Preserve balanced extraction by mastering how to clean a conical burr coffee grinder in November 2026 using safe dry brushing, chute clearing, and cleaning tablet methods.
 By Kenneth Davids
Updated November 10, 2026
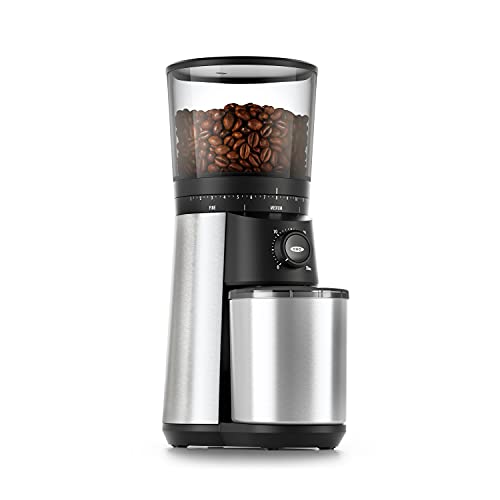
Residual coffee oils and microscopic grounds accumulate inside your grinding chamber with every single brew, gradually turning rancid and spoiling fresh roasts. When old coffee dust cakes around the inner cone and outer ring, particle size uniformity suffers and causes uneven extraction that tastes harsh, astringent, or muddy. Mastering how to clean a conical burr coffee grinder prevents bitter residue buildup while protecting delicate motor assemblies and calibration settings from premature mechanical strain. Whether you brew daily pour-overs or pull rich morning espresso, consistent hygiene keeps your equipment operating smoothly and your coffee tasting clean.
Many home brewers overlook maintenance until a motor binds up or stale odors overpower subtle bean notes. Routine maintenance does not require complex tools or endless downtime, especially when you know the difference between dry brushing and using specialized cleaning pellets. Learning how to properly clean electric models like the OXO Brew Conical Burr Electric Coffee Bean Grinder or hand-cranked manual burr grinders preserves your gear for years. A systematic maintenance habit ensures that every morning cup highlights sweet origin characteristics rather than rancid oils from last month.
| Award | Product | GCG Score About GCG ScoreThe GCG Score is our own rating from 0 to 10, based on performance, design and build, ease of use, and value. It reflects independent research and is never influenced by manufacturers, retailers, or affiliate commissions. Learn more › | |
|---|---|---|---|
| Best Overall |
OXO Brew Conical Burr Electric Coffee Grinder
|
8.9/10 | Buy |
| Best Value |
 Roobi Coffee Grinder Cleaning Tablets (500g) |
8.8/10 | Buy |
OXO Brew Conical Burr Electric Coffee Grinder
Equipped with 40mm stainless steel conical burrs and 15 grind settings with 43 micro-adjustments, this electric grinder provides uniform grounds for everything from French press to espresso. It is a reliable choice for whole bean coffee lovers wanting fresh morning flavor and balanced extraction.
Pros
- Durable 40mm stainless steel conical burrs provide consistent grind uniformity across diverse brew methods
- 15 base grind settings with 43 micro-adjustments offer precise calibration from fine espresso to coarse French press
- UV-tinted 12-ounce bean hopper protects whole coffee beans from light exposure between daily brewing sessions
- Intuitive one-touch push button retains previous settings to simplify busy weekday morning coffee routines
Cons
- Oily dark roast beans may require frequent hopper and chute cleaning to prevent residue buildup
- Grounds container may generate standard static cling depending on room humidity and bean roast level
- Ultra-fine non-pressurized commercial espresso calibration may require careful micro-adjustment dialing
Roobi Coffee Grinder Cleaning Tablets (500g)
Designed for both home baristas and commercial setups, these food-safe pellets purge built-up coffee oils and stale grounds without requiring grinder disassembly. The 500-gram tub delivers up to 14 routine maintenance cycles using an odorless, carbon-neutral formula.
Pros
- Eliminates the need for manual grinder disassembly
- Food-safe, vegan ingredients leave no odor or aftertaste
- Maintains burr performance and grind consistency
- Eco-friendly carbon-neutral formula with recyclable packaging
Cons
- Yields only 14 cleanings per 500g tub
- Bulky 1.1-pound container takes up counter space
The Mechanics of Conical Burr Maintenance and Deep Cleaning
Conical burr grinders rely on a revolving inner cone that nests snugly within a stationary outer ring to crush whole beans into uniform fragments. Because this cutting geometry forces beans downward through progressively narrowing teeth flutes, compacted fines and natural lipids inevitably settle into the microscopic crevices of the steel. Understanding how to clean a conical burr coffee grinder begins with recognizing how these physical residues behave over time. Establishing a structured cleaning workflow restores original particle consistency and prevents stale ground exchange from contaminating your delicate specialty coffees.
Why Coffee Oils and Retained Fines Threaten Conical Burrs
Every coffee bean contains delicate lipids and aromatic compounds that migrate to the surface during roasting. When steel burrs crush these beans, mechanical friction and warmth press those oils against the cutting surfaces and plastic chamber walls. Over several weeks of room-temperature exposure, these trapped lipids oxidize and turn rancid, imparting an unmistakable sour, cardboard-like aftertaste to future brews. Even the freshest single-origin coffee will taste flat if it must pass through an oily, neglected burr chamber.
Microscopic coffee particles, commonly called fines, present an even greater mechanical threat than surface oils. These powdery fragments combine with sticky coffee grease to form dense, caked deposits between the burr cutting flutes and along the exit chute. As this layer thickens, the motor must exert significantly more torque to spin the drive axle, which increases operating temperatures during active grinding. Elevated grinding heat can prematurely bake aromatic volatile compounds out of whole beans before hot water ever touches them in the filter basket.
Compacted fines also alter the effective burr spacing and disrupt ground distribution. When hardened coffee paste wedges into the adjustment threads or between burr teeth, the grinder cannot maintain its calibrated distance accurately. This misalignment widens your particle size spread, generating erratic boulders alongside excessive dust that stalls percolation flow. Regular cleaning eliminates these obstructions, allowing the cutting surfaces to deliver consistent particle uniformity for clean, balanced extractions.
Essential Safety Rules and Preparation Before Grinder Disassembly
Electrical safety is the primary requirement before beginning any physical disassembly on motorized kitchen appliances. Always disconnect the power plug from the wall outlet before touching the hopper, burr carrier, or grind chute. Never rely on the power switch or hopper interlock switch alone, because accidental activation while hands or tools are inside the cutting chamber can cause severe injury. Keeping the machine fully unpowered creates a safe workspace for inspecting internal components.
Preparing the right tools in advance makes the cleaning process swift and mess-free. You will need a stiff-bristled utility brush or natural hair pastry brush, a clean dry microfiber cloth, a wooden toothpick or bamboo skewer, and a vacuum cleaner with a narrow nozzle attachment. Set up a shallow tray or bowl on a clean, dry countertop to hold small screws, springs, or washers that might come loose during disassembly. Having everything within arm reach prevents lost hardware and keeps coffee dust confined to your designated work surface.
Never expose stainless steel or carbon steel burr sets to liquid moisture. Washing burrs under a running tap or soaking them in soapy water triggers rapid surface oxidation, creating rust that permanently blunts the razor-sharp cutting facets. Water can also seep down the motor drive shaft into internal bearings and electrical gearboxes, leading to catastrophic short circuits or bearing seizure. Keep all internal grinding mechanisms strictly dry throughout the teardown process.
Step-by-Step Manual Disassembly and Dry-Brushing Procedure
Start your physical teardown by clearing any remaining whole beans from the feed system. Close the bean hopper shut-off gate if your machine features one, or invert the unpowered unit gently over a bowl to dump remaining beans. Run the grinder for two or three seconds while plugged in to clear any loose beans caught between the teeth, then immediately disconnect the power cord. Empty the grounds collection bin completely and set it aside on your workspace.
Remove the bean hopper according to your specific machine design. On many home units, such as the OXO Brew Conical Burr Electric Coffee Bean Grinder, the hopper unlocks with a firm counterclockwise twist. Lift the hopper straight up to expose the top burr assembly nestled inside the adjustment collar. Inspect the upper locking tabs and the gasket ring for stray grounds or bean shards that might prevent smooth re-engagement later.
Extract the removable upper burr ring from the grinding cradle. Most consumer conical grinders utilize a wire handle or release tabs on the upper carrier that lift straight out without requiring specialized screwdrivers. Once removed, use your stiff brush to sweep along the spiral cutting flutes from top to bottom. Take your time working around the entire circumference of the ring, dislodging packed oils and compressed coffee crust until the bare metal teeth are clean and sharp.
Turn your attention to the stationary lower cone burr fixed to the central motor axle. Because the lower burr is often permanently mounted or secured with a reverse-threaded lock nut, brushing it in place is generally safer than total mechanical removal. Rotate the central spindle by hand while brushing the flutes vigorously, sweeping loose coffee grounds toward the vacuum nozzle. Use a wooden toothpick to gently pick out any stubborn, rock-hard coffee deposits wedged deeply between the lower teeth, taking care never to use metal screwdrivers that could chip the cutting edges.
Cleaning the Bean Hopper and Removable Grounds Container
Unlike the metal grinding chamber, external plastic accessories benefit from occasional wet washing to remove sticky surface films. Coffee beans leave an oily sheen across the inner hopper walls, particularly when brewing medium-dark or dark roasts. If left unchecked on a large capacity home coffee grinder, these bean oils oxidize and create a sticky glaze that impedes gravity feeding. Wash the empty hopper and the grounds catch cup in lukewarm water mixed with a drop of mild dish detergent, avoiding abrasive scouring pads that scratch clear plastic.
Never place plastic hoppers, tinted covers, or grounds bins inside a high-temperature automatic dishwasher. Dishwasher heat cycles and harsh alkaline detergents can warp plastic locking tabs, degrade silicone gaskets, and turn clear or UV-tinted hoppers permanently cloudy. Wash these components gently by hand using a soft sponge or microfiber washcloth. Rinse thoroughly under running water until all soap fragrance vanishes completely, ensuring no chemical scents linger to taint your coffee beans.
Allow every washed plastic component to air dry completely on a drying rack for several hours before reassembly. Even a single microscopic droplet of water clinging to the bottom hopper gate can drip straight down onto the steel burrs, causing localized rust spots or clumping fresh grounds. Wipe the parts down with a dry lint-free towel and inspect the corners carefully. Only reattach the hopper once you are completely certain that every plastic surface is bone dry.
Using Coffee Grinder Cleaning Tablets for Quick Maintenance Without Disassembly
Full mechanical teardowns take time, which makes intermediate maintenance with cleaning tablets an attractive routine for busy coffee drinkers. Commercial formulations like Roobi Professional Coffee Grinder Cleaning Tablets utilize compressed, food-safe, grain-based pellets designed to absorb coffee grease directly. As these dry pellets pass through the rotating burrs, they act like miniature sponges, stripping away sticky surface lipids and dislodging stale fines without requiring you to remove a single casing screw. This approach delivers a fast deep clean that keeps your machine operating at peak performance between scheduled manual disassemblies.
Running cleaning tablets through your machine requires a simple, controlled protocol. Empty all whole beans from your hopper, then drop the manufacturer-recommended dosage of tablets directly into the burr throat. Adjust your grinder collar to a medium or medium-coarse drip setting; running cleaning pellets on an ultra-fine espresso setting can create excessive motor resistance or pack powder into the chute. Switch the motor on and let the tablets grind completely into the collection container, observing how the white or tan pellets emerge discolored by absorbed coffee oils.
A thorough purge cycle is necessary after grinding any cleaning pellets. Although quality formulations are food-safe, vegan, and leave no chemical odor or aftertaste, residual tablet dust should not end up in your morning cup. Add roughly fifteen to twenty grams of inexpensive sacrifice coffee beans into the hopper and grind them through at your normal setting. Discard this mixture of coffee grounds and tablet powder, empty the collection bin, and wipe the chute mouth clean before brewing your next prized roast.
Clearing Exit Chutes, Sweeper Paddles, and Declumper Flappers
The exit chute connecting the burr chamber to the grounds container is the primary bottleneck for static cling and coffee compaction. Most consumer electric grinders feature silicone declumper flaps or metal wire screens inside this pathway to reduce flying chaff and break up dense clumps. Unfortunately, oily grounds and fine particles often build up behind these barriers, creating a solid plug of stale coffee that contaminates fresh doses through dynamic exchange. If your grinder suddenly retains more coffee than usual, the exit chute is the most likely culprit.
Clean the discharge tunnel carefully using a flexible pipe cleaner or a soft nylon tube brush. Insert the brush gently upward from the catch bin opening into the chute, twisting it slightly to dislodge the caked wall of old coffee. Simultaneously position a vacuum nozzle near the opening to catch falling clumps so they do not settle on your counter or back into internal motor housings. Avoid shoving rigid metal tools or thick screwdrivers into the passage, as puncturing or tearing the delicate silicone declumper flap will result in severe static dispersion and spray across your counter.
Many modern brewers pair routine chute clearing with silicone bellows or manual air bulbs to maintain low retention. Delivering a quick pulse of air through the empty bean hopper while the burrs spin to a halt blows lingering grounds clean out of the chute. Incorporating this quick air purge into your daily grinding habit prevents fines from settling into dense crusts between deep cleans. Keeping this exit tunnel clear ensures that the exact weight of beans you put into the hopper matches what lands in your portafilter or brew basket.
Reassembly and Zero-Point Calibration Verification
Reassembling a conical burr grinder requires patience and tactile care to prevent cross-threading delicate adjustment assemblies. Align the upper burr carrier into its metal or plastic housing, paying close attention to index alignment marks or guide notches molded into the chassis. The carrier should seat completely flat and level without rocking or sticking. Never force a burr carrier down with heavy hand pressure; if it resists seating, lift it out, vacuum away any stray ground caught in the guide tracks, and try again.
Once the upper burr rests squarely in its cradle, re-engage the adjustment collar or hopper ring by rotating it clockwise into position. On machines with extensive adjustment latitude, such as the OXO Brew Conical Burr Electric Coffee Bean Grinder with its 15 primary settings and 43 micro-steps, rotate the dial through its entire span from coarse to fine. The collar should glide smoothly through each notch without grinding or binding. If the dial feels unusually stiff or catches unexpectedly, the carrier is likely seated crookedly and must be reset before running the motor.
Verify your mechanical calibration before loading fresh beans into the hopper. Plug the power cord back into the wall outlet, set the grinder to its coarsest setting, and tap the power switch for two seconds to confirm the motor turns freely without unusual high-pitched rubbing noises. Slowly step the adjustment collar down toward your target brew setting while listening carefully. A clean, correctly aligned conical burr assembly emits an even, rhythmic hum that confirms it is ready to grind accurately.
How Often to Clean Conical Burrs Based on Roast Level and Usage
Your ideal cleaning frequency depends heavily on the roast profile of your preferred coffee beans. Dark Italian and French roasts feature glossy surface oils that adhere rapidly to burr teeth, necessitating a quick dry brush every seven to ten days and a tablet purge every two weeks. Light to medium specialty roasts contain far less external oil, allowing you to stretch deep cleaning sessions to once every four to six weeks under normal home consumption. However, if you notice your pour-over drawdown times slowing down significantly, compacted fines in the chamber are signaling that a cleaning session is overdue.
Establishing a three-tiered maintenance habit keeps grinder care simple and manageable. On a daily level, use a short burst of air from a bulb or tap the chute gently to expel retained grounds after your morning brew. Every two weeks, run a dose of cleaning pellets through the mechanism to dissolve early oil films before they harden into crusts. Once a month, take ten minutes to perform a complete manual teardown, dry-brushing the burr flutes and wiping the chute completely clean.
Maintaining clean grinding hardware fits into the broader picture of overall coffee hygiene. Just as cleaning reusable coffee equipment preserves extraction clarity by removing baked-on coffee solids from brew baskets, keeping your burrs free of old residue guarantees that only fresh, pristine grounds reach your cup. Treating your grinder with consistent care protects your equipment investment and rewards you with aromatic, vibrant, and delicious coffee every single day.
About the author
Kenneth Davids is a veteran coffee writer, educator, and sensory expert with decades of experience evaluating specialty coffee. He has authored several influential books on coffee, covering brewing, buying, roasting, and quality assessment. His deep understanding of flavor, preparation methods, and coffee evaluation brings an experienced perspective to helping consumers make better-informed coffee choices. Davids has been involved with coffee since the early 1970s, has published three coffee books, and has led workshops and seminars on sourcing, evaluation and coffee communication internationally.